PART 2 HERE

My version, above, not yet painted or prettied up, alas....
Bronze Age version
 | |
| Penannular Brooch, invented in the Iron Age and used a lot throughout history to hold up cloaks and stuff. |
To those of us who do not have forges (unlike these amazing craftsmen...sob sob) here is how to make one that looks kind of like this, using nothing but household materials.
You will need.
- Cheap Wire Hanger (the dry cleaner kind. I have been to the dry cleaners once in my life, but I have billions. I think family tends to save them, and I inherited a goodly amount)
- Steel Wire Gauge 18 or 20 (You can use other kinds of wire. Steel wire is probably the hardest to work with. But from Lowe's its just sooooo much cheaper than jewelry/craft wire. $5 for 110 ft)
- A good pair of Needle Nose Pliers
- A good pair of wire cutters. (you're going to need something with decent umph to get through the hanger. I killed my dollar store wire cutters on it. We spent $8 at Lowes to get these Kobalt wire cutters with a little pivot in them, but they've held up really well through making a lot of stuff. Tools are a capital investment, and worth it)
- Metallic Spray paint of your choice.
- A table let/fat dowel/shower curtain pole/ something strong you can bend stuff around. A SMALL CAN OF TOMATO PASTE WORKS BEST
- (Optional) Steel Wire Gauge 24
 |
| Here is a glam shot of the tools. |
STEP 1
Bend your hanger around your table let/dowel/strong roundish thing. DO NOT CUT your hanger first, it makes it MUCH harder to maneuver. You will have to bend it around, then sorta unbend it to get it off. Scrunch it back to its shape, AND THEN cut off the non-circular part.
 |
| Voila, its a circle. |
 |
| I scrunched it a bit to get the radius I wanted. |
 |
| ....And trimmed it to desired size. I laid it down next to the finished one to make sure I was getting the size I wanted. |
Bend it first, then trim it. Believe me, its so much harder to get a smooth circle if you cut it first and then try to bend it with nothing for your hands to really grip on to.
STEP 2
Cut a length of your 18/20 gauge stuff, and wrap it around the C. You'll want to match middles to middles, it makes the wrapping wire process much easier. (instead of having a huge 'tail' you have to manipulate around).
 |
| Begin wrapping, middle of the wire to the middle of the C. |
 |
| Wrap to the ends. |
 |
| Wrap the remainder of the wire around the ends of the C, to create a little bit of a 'bump' on the ends. You'll need to use the pliers when the wire gets really short, or risk hurting your fingers. |
Also, you'll want to wrap it decently close, as you'll be 'filling in the gaps' by repeating this step twice more.
STEP 3
Cut 2 more lengths of wire, and repeat this process twice more. I think it looks a lot better if you don't cross the pieces over eachother, but keep them all twisting neatly against the C in their own little swirly rows.
 |
| I wrapped the coils on the left one closer together, and the one on the right a little wider. See the different effects. |
STEP 4
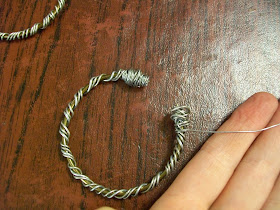
optional. I like to take the really thin wire (gauge 24) and since its so easy to manipulate, wrap it around the ends, to bulk them up a bit and cover up the other pointy ends of wires.
 |
| you can see how I've wrapped one end with thin wire to cover up sharp ends, I'm doing the same with the other one now. |
In part 2, we'll make the pin, and in part 3 spray paint it to a uniform color.
Part 2: Making the Pin here


Where is part 2 of the tutorial?
ReplyDeleteI'm working on it. Should have it up within a week...
DeleteI, too, am looking for part 2.
Deletehere it is http://makingrivendell.blogspot.com/2014/10/how-to-make-penannular-brooch-fibula.html
DeleteThis comment has been removed by the author.
ReplyDeleteSorry it took me so long, here is part 2
ReplyDeletehttp://makingrivendell.blogspot.com/2014/10/how-to-make-penannular-brooch-fibula.html