Showing posts with label 1940s vintage. Show all posts

Tuesday, August 18, 2015

Aunt Bekah's Visit, and an Apron


Aunt Bekah got to visit for a week. It was a lot of fun. Isaiah got to hear Beowulf again. And eat a lot of peaches. And watch Star Wars Rebels season 1 through at least 3 times.


She was kind enough to model some old sewing projects for me, that I sewed this year but never got round to photographing.

Here is my standard T-shirt. I like cap sleeves, v necks, and fitted but not too fitted. I make them from T-shirts from the thrift store, because its so very much cheaper than buying knits new.


Here is an apron I made in May. I love aprons. You can wipe kids jammy fingers on them, you can scoop up and transport laundry/toys/oranges, etc in your skirt without flashing people. They are so handy, and erase the extra stress of worrying of getting tomato sauce/peanut butter/dishwater on your favorite clothes.

I based it off of Richard Scarry's picture of Grandma Bear's apron. Given how comfortable it is, I assume it must have been a standard type of apron back in the days when women wore aprons a lot more (Grandma Bear is always wearing her apron). It is SOOO comfortable.

See how the neck straps come down the back.
 Here is an example of the apron on Mommy Cat.


I love aprons, but I hate feeling something pulling on the back of my neck (like a halter top) it makes me feel like I'm being choked. This apron's design is very good, its shoulder straps cross across the back and then connect in a wide X to the sides of the apron, bearing the weight very nicely. The fit can be adjusted by the standard ties on the sides.


Here is a write up of the measurements I used.

It was simple and straightforward to make, basically the waistband is a long rectangle that you iron in half lengthwise, inserting in another rectangle that you gather to be the bottom half of the apron. Then you sew the waistband's edges down and it holds the skirt part in. If you stop here its a half apron.
To make it a full apron, I just sewed another rectangle (the top part) with 2 wide straps onto it. Then tried it on, pinning the straps accross my back, and then cut and sewed them to the proper place.  Its all rectangles and straight seams. Ironing helps it go together very easily. I got 2 half aprons and one full apron out of a nice weight cotton sheet.

Plus, aprons look so pretty and tough and cool. Like Ma Ingalls. She was the essence of coolness...


And the kids decided that mommy had taken enough pictures of Aunt Bekah....


She wanted to hold Isaiah too....


And it still fits at 9 months pregnant too...


A line Skirt Pattern

My sister is teaching. Nothing quite says "women's proffessional clothing" the way 1940's does. To me anyway. Because 1940s was really when women entered the workforce to help save the world and all that.

Anyway, pencil skirts dont' look good on this sister and I due to our body shape (pear/hourglass) so I went for A-line, with some shaping in the side seams and back waistline darts.

She humored me and posed in a messy kid's room at midnight, since she had to fly out in the morning....


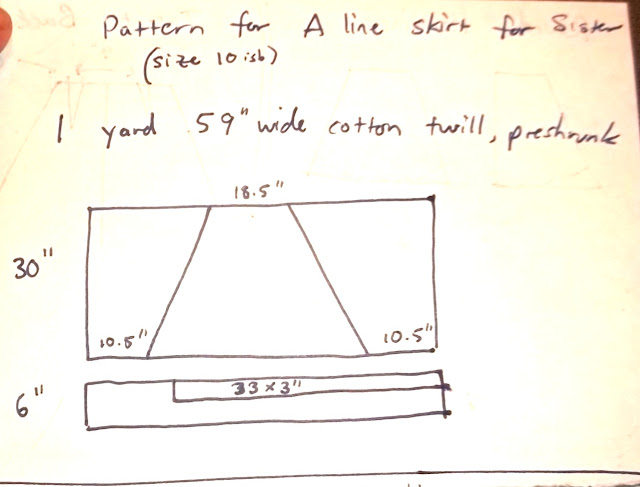
 I made her some skirts from cotton bottomweight twill from JoAnns. Each skirt was made from 1 yard of 59" fabric.

 The shaping in the waist was divided into 6 parts. 1 part on each side, front and back (so 4" total), and 1 part each in the 2 back darts (so 2" in back darts total), tapering the waist 6" total from the simple triangular trapezoidal shape.
(When I didn't do this, the waistband ends up migrating down, and it gets really tight over the abdomen. By shaping the waist, it stays where its supposed to, and leaves more room over the abdomen) I found this ratio through trial and error, but found afterwards that this rule of thumb from these instructions. Basically, you draw the lines up from the size of the bum, and then calculate the excess amount in the waist. You divide this excess into 6 parts, then take out 4 parts in side seams, 2 parts in the back darts.

Also when shaping the "scoop" in the waist (to make it hang better, and not hug the abdomen), I have to keep at least 2" straight on the edges, and then GENTLY taper down to the depth at the center (1.5" depth center front, 2" depth center back). I also had to remember not to make sharp inflection points or it wrinkled.


It turned out nicely. I didn't do the waistband right at her natural waist, but a little below it, because I think that looks more flattering on women.

I was pleased.