Sunday, January 12, 2014

To love with God's love...


Isaiah is a very loving child. "I wuv you Mommy!" he bursts out at random times while playing. Today, while sitting in the living room, watching him play I told him "I love you Isaiah"
His response was to burst out with a joyful proclamation of affection--- just not to me.
"I wuv you Jenny!!" he called out to his little introverted sister, off playing cars in a corner.
Later, on our family walk, I told him I loved him again. Again he burst out with affection
 "I wuv you black cat!!!" at a stray cat napping in a patch of sun.


My telling him that I love him makes him burst out with love to other nearby people (or animals). At first I found it amusing, comparing it to our normal adult world of reciprocated love, where an "I love you" expects an "I love you too" directed back at the initial speaker.

I thought he was funny.

Then I realized God was trying to tell me something.

I've found relying on my human love for people isn't enough. Especially when people I care about are going through great pain, or destructive cycles, or things I can't change (even when I think I could..."if only they would listen to me...")

My human heart wants to withdraw. To just get away from the pain or hurt or watching a trainwreck. I find myself emotionally distancing myself, trying not to care, trying to protect myself.
But I know that isn't right. Its not right to pull away from those in pain.


But I see (especially in the ministry) those far more generous and empathetic than me, who stay involved, who care, who listen and speak timely words. Those who try to stop the trainwreck, desperately signalling to the drivers till the last second, who are there among the screeching metal, and then try to climb through the shattered windows to drag out the survivors, trying their best to do resuscitation. And many of those end up drained and wounded, burned out with no strength left to love or even to live.

I want to care. I want to love like Jesus demanded. I'd rather not end up a charred corpse.


Then I realized God is trying to tell me something.

Just as Isaiah, on hearing that I love him, loves the whole world, so our love is to come from God.
Like the sun, radiating its solar energy, that becomes the chemical energy of plants, that becomes the chemical energy of our food, that becomes the kinetic energy of the kids frolicking in the back yard, that becomes the potential energy of the ball thrown on the roof....so it all begins with one souce, that radiates the light energy out.

It is God's love that enables us to love. It's His love that we are to love people with. Our own mortal little hearts run dry and empty on our own love, whether they be shallow or deep, the well eventually runs dry. Because we weren't made to love on our own strength, any more than the grain can grow without the sun, or my kids can run around without food.


"I shall run the way of Your commandments, For You will enlarge my heart. "

And Psalm 119:32 shed's light on God's command to love my neighbor as myself.

God isn't telling me that it won't hurt, or that there won't be trainwrecks. But He has promised me Himself.
His beauty, His Holiness, His face, His love will be enough.

I can't love people on my own strength. I can't bear people's problems or sins in my spirit.

God can. And God can love them. And God does love them. And God will love them through me.
So I need to learn, to keep my eyes on Jesus, and love with His love. To let myself be a conduit, a pipe, from the Spring of Living water.

But I need to fix my eyes on Him, in every messed up situation, to know, to see, HIM.
And He will be enough for all of us, for all the pain, for all the messed-upness, all the sin, all the trainwrecks.

His face will be enough.


And I have to let him enlarge my heart, even when it hurts. But not to take my eyes off His face, even in the worst of train wrecks, because it is Him that will save.
I cannot save. I can only obey.

Friday, January 10, 2014

A Preview...

Thinking of how to make my house beautiful, a preview of the medieval wall hangings....


THE FINISHED BRACERS Making Bracers/Vambrances/Gauntlets Part 5.

Here, I glory in the bracers I made my siblings for Christmas. The 5 part tutorial is here.


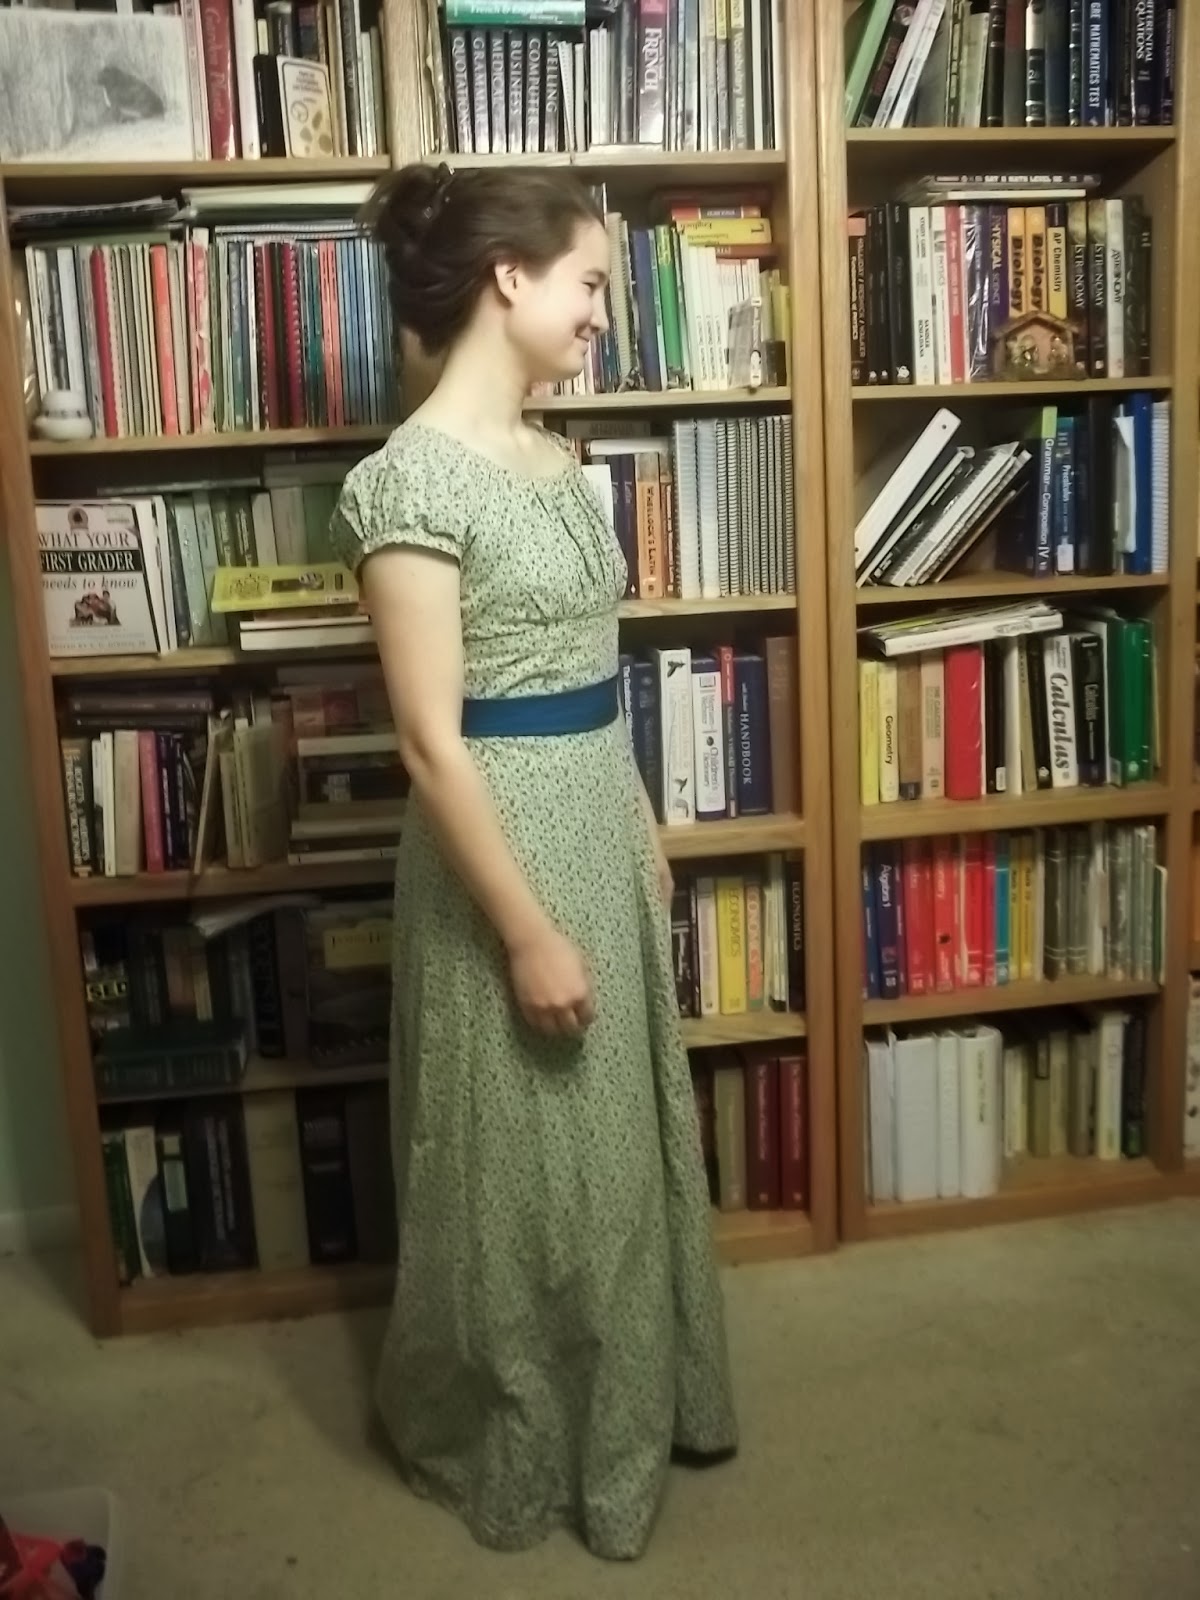
Leah's Christmas Dresses (Regency inspired, with a thick waistband)


So I had made my sister this red regency inspired dress a while ago....


 but I wanted to make something more modern this time. So I thickened the waistband to extend to her natural waist, and slipstitched on a sash. I left the puffed sleeves and the drawstring elastic neckline the same.

These are not the best pictures, as we were leaving in the morning, and I realized around 11 pm that I still hadn't got pictures of her in the dress, so I snapped some pictures in the low light with my little point and shoot camera. She looks even more beautiful in person.

The first one was a yellow calico with blue flowers on it. I cut the skirt a simple A-line. the finished length was 40" which was a tad too long. I think in the future I'll aim for a finished length of 37".


I don't know why the waistband is wrinkling. I think I have to take away a little fabric in the underbust seam under the arm maybe?

I think she was eating something. But she looks so cute I had to put it up.


Then there was the Purple and white one. I lined the dress completely with muslin, so to keep the white from being see-though. I cut the skirt out as a half-circle, and as it was from a 45-43" wide fabric, the skirts finished length was around 33". Leah like it, and the swishyness. I think I'll need to make her a petticoat to go along with it.
The sash is slip-stitched on.

 My greatest pride and joy with this is the sleeve bands. I had a brain wave to make them kind of "framing" of the print, by using purple that was in the print. They have a very nice framing effect. I danced for glee, and showed it off to everyone.


The last picture shows it truer to its real colors, as it is white, and not cream as the bad lighting makes it look.

I need to get nice sunlit pictures of her in in them. I will post them when I do.

Tuesday, December 31, 2013

Making Bracers/Vambraces/Gauntlets Part 4: Inserting Grommets/Eyelets into Leather without a hole punch, Dyeing Leather with Shoe Polish

(All parts of tutorial listed on this page)
See tutorial part 1,and  part 2, and part 3
FINISHING (Grommets, Dyeing)
Note the kind of "weathered" look. I achieved this with fabric dye and shoe polish. (plus some ill fated salad dressing) See below.


How to insert grommets into leather without a Hole Punch.
  1. Using an exacto blade, and a pencil to insert 1/4" eyelets without a hole punch.
  2. First, cut a (small!) slit where you want the eyelet to go. 
  3. Then force a pencil through it, underside out. 3x. It should feel difficult, as the leather stretches. Then send the pencil through the 4th time, from the leather side (this pushes the leather in). 
  4. Now insert the tall side of the grommet from the leather side. I used a pencil to help push it through.
  5. Then flip it over, and using a fingernail or the tip of the pencil, poke all the unruly threads down around the lip of the grommet.
  6. Now put on the shallow side of the grommet.
  7. Put it on the eyelet "anvil" and hammer the "tool" part onto it, making sure to rotate the tool while hammering.
  8. DONE.


Re-dying leather bracers.
 
To change the color of the leather, dye can work, but it kind of hangs out on top and rubs off. (I used RIT dye orange).  I didn't like the look of it alone, and it seemed to come off to easily. However, it works very well underneath shoe polish. I had greenish brown leather, and I wanted a warmer brown leather, so I rubbed orange RIT dye on all of them, and then rubbed them all down with brown shoe polish and brown shoe cream after I was done quilting them. I liked the uneven color, it gave more depth. If you want even color, shoe polish it before quilting.

I had a bad experience with hand-made conditioner (salad dressing, basically vinegar and olive oil). It blotched and stained funny. I guess if you want darker stains on it to look weathered, then go for it.

The 5 part tutorial is here.

Monday, December 30, 2013

Making Bracers/Vambraces/Gauntlets Part 3: Assembling the Bracers, How to make thin leather into thick leather (or at least act like it)

See Tutorial Part 1 and Part 2 here 


The 5 part tutorial is here.


Assembling the Bracers
STEP 1: Cut out your pieces
You will now cut out your bracer pattern in leather, in your 'sandwich filling' quilting medium (batting or felt or fleece. I found felt to be a bit stiff for me, and batting to be too expensive, so I used fleece. A fleece blanket actually...), and in canvas/broadcloth etc whose color roughly matches your leather. I was using brown leather, and I used a brown twill canvas that was already somewhat broken in (my favorite skirt in college...).
Leather, Canvas, and Fleece

STEP 2: SEW YOUR MIDDLE AND BOTTOM PIECES TOGETHER
Now I found that trying to assemble all 3 pieces together at once meant pieces shifting around, etc. which is a pain. Especially since even if you rip stitches out of leather you have a little trail of needle holes.
It saved a lot of time if I quickly sewed the filler/fleece to my bottom canvas piece first, so to make the next step simpler when I sewed it to the actual leather.

Ta-Da, Fleece sewn to canvas.
 Note, if your fleece sticks out a bit past your canvas, trim it to the canvas. Its like, we don't want the sandwich filling to be coming out the middle (especially in my classy bright blue) so we want the top and bottom sandwich pieces to be bigger than the filling.

STEP 3: SEW THE LEATHER TO THE CANVAS/FLEECE PIECE, LEAVING ONE SIDE OPEN
You'll want to put the "right sides together" which means, the side of your leather you want showing, against the canvas side. So on the outside you see the wrong side of your leather, and the fleece. It's like sewing a pillow case. And like a pillow-case, you'll want to leave one side open so you can flip it inside out.
I sewed across the wrist, down one side, across the bottom, and stopped at the other side.
Note, I left one side open.

STEP 4: FLIP IT INSIDE OUT, SEW DOWN THE OPEN SIDE
Now, we'll flip it inside out, (or rather, right side out).


Ta-da...now we'll sew down the open side.

Now its looking a lot more like a bracer. But note in the picture below how "puffy" it is, it looks like a sleeping bag, and not like a thick piece of leather.

Puffy sleeping bag effect.

STEP 5: TOPSTITCH IT ALL AROUND THE EDGES
This is where you make it look like a thick piece of leather. It will now behave like one piece, and less like a puffy sleeping bag with the opening sewn shut.

Top-stitched all around the edges.


No more puffy effect. Acts like a thick piece of leather.
 This technique works with thin leather for everything, even making hauberks out of thin coat leather. The trick is in the topstitching (and quilting does it even more) in anchoring the thin leather to a thick base, so it bends like its thick (and doesn't shift and wrinkle)
I should have used it more in Josh's Faramir 1.0 hauberk, instead I left it at the 'puffy sleeping bag stage' and so while the thin leather was attached to canvas, it wasn't anchored, and thus still shifted around and wrinkled when my son pushed on it.
Here, it looks great, because there's not little toddler putting stress on it.
Here, you can see how its wrinkling---because I didn't anchor it to the canvas properly. Thus when Isaiah stuck his hand there, he could get the leather to still wrinkle and look thin. If it were anchored better to the canvas, it would not have wrinkled.

In the next post, we'll cover quilting the leather, putting in grommets (without a hole punch...who has 1/4" hole punches lying around their house?), and weathering/dyeing it.


 COMING SOON....


VERY IMPORTANT TIPS FOR SEWING WITH LEATHER
First off, use the thin cheap(er) leather to quilt. You don't want to be forcing hauberk thickness of leather through your sewing machine. You can (with grit and determination) hand sew the thick stuff. Killing your sewing machine is not worth saving a little time. Test on a scrap, if your sewing machine sounds like its straining, don't do it. (Also, thick leather won't quilt very well anyway)

I CANNOT STRESS THE IMPORTANCE ENOUGH, OF USING A BIG NEEDLE. Thinner needles will bend (especially with all the layers of fabric, quilting etc) and cause you all sorts of tension problems. SO. NOT. WORTH. IT.
You can get a pack of sewing machine needles(6 needles) from Walmart for 2 bucks. There will be some size 11 (quilting cotton), some size 14 (jeans), and some size 17 or 19 or something (I forget).
USE THE BIGGEST ONE. 
I never paid much attention to needle size, and spent a lot of frustration on bent needles and messes of thread that ensued. This size 19 (or 17?) one has lasted me through 8 sets of bracers without bending so far. So much time saved.

Another thing sewing with leather (if it isn't all suede-like) is that the 'waterproof' side has friction issues with my presser foot. I could probably get some fancy foot that would fix this, or sew with a layer of tissue paper, etc, but all I did was sew with my cloth side up, and my leather side against the face-plate (which didn't have as many friction issues.)

I fiddled with stitch length, I liked something between 8 and 9 stitches per inch, it seemed to give a darker 'line' and thus seemed a tad more like tooling. (But not so tight that you essentially perforate the leather, and make it tear easily). Figure out what stitch length you want on a scrap, with the proper layers of quilting.

A NOTE ON QUILTING: It is essential that you don't quilt the lines too close together, or the design doesn't really have space to "puff" and look 3 dimensional. I found that when I quilted lines closer than 1/2" apart, the whole thing just went flat and boring.
Also, the design seems to puff up more as you vigorously rub it with shoe polish on a cloth when you are done quilting. If you don't want to dye or polish it, just rub it with a cloth at the end. It helps the whole thing fluff up and look cool.