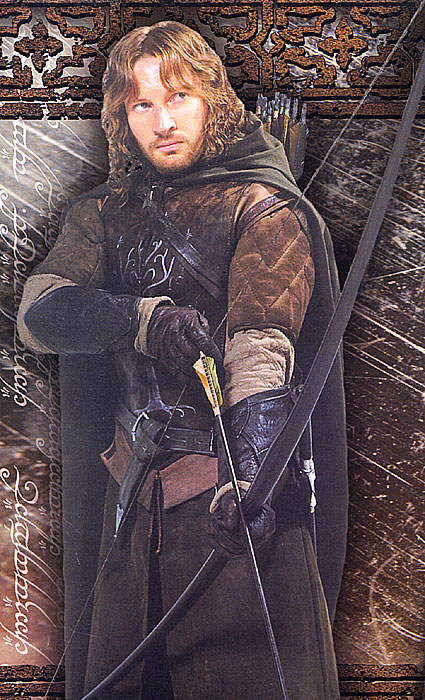
Showing posts with label Link legend of Zelda. Show all posts

Thursday, August 28, 2014

More Thoughts on Making Faramir's Scabbard & Quiver and Link's Scabbard & Belt

Some Thoughts on Making Faramir's Quiver and Scabbard. (And on making Link's back scabbard)

Most of these Pictures come from THIS INCREDIBLY USEFUL WEBSITE with a complete piece by piece breakdown of the entire ensemble, with line drawings by gryphonsmith
So I had thoughts on the breakdown of the Faramir vs Link Outfit here,  thoughts/planning on Faramir's quiver and pants and shirt here and here's my first attempts log and my first attempt pix, as well as initial thoughts on bracers and a lot of work on the bracers and a bunch of work on getting the half circle cloak right... 

(finish) Faramir Ranger Outfit for Josh
  1.   Hauberk 1.0 (requilt the old hauberk, and to make the thin leather seem like thick leather...)
  2.   Hauberk 2.0 (Buy New Thicker Leather) use quilting techniques I learned from the bracers
  3.   Tan Quilted Tunic shirt, (use sheet)
  4.   Brown pants (use sheet)
  5.   Green Overtunic (use thick stuff)
  6.   Faramir's Belt (with optional Link pouches)
  7.   Link's back scabbard
  8.   Faramir's quiver
  9.    making Boots/boot-covers 1.0,
  10.    quilted leather vambraces/bracers (Buy New Thicker Veg Tan Leather)
  11.    quilted pauldrons (1.0 from canvas, use split hide in final?)
  12.    cloak (make a new cloak like this from my 4 yds of loose woven wool, need to dye it first)
  13.    Green Medieval Tunic (half-sleeve Link Style)
  14.    BOW with fletched Arrows 
This post is on #7 Back Scabbard and #8 quiver and #6 belt.


We will look at Faramir's Scabbard (hip), and Link's Scabbard (back).

First, Faramir's Scabbard.
  
We see its a main belt, with 2 straps coming off of it, the first a short strap to the top of the scabbard, and the second strap looks like it may be adjustable, about 1/3 way down the scabbard. This is to keep the sword from swinging willy-nilly on your belt when you run, etc. If its adjustable (I think I see a small buckle there) it allows you to adjust the angle it hangs for a quick draw.


Link's scabbard is a back scabbard. It's basically a main belt with a smaller strap riveted to the belt in 2 places.
The main belt goes over his chest and over one shoulder and down his back. There is some sort of leather shoulder pad to distribute the weight better. (Especially as I think he also hangs his shield on the strap across his back). Then there is a strap that is riveted onto the front and back to keep the scabbard stable. It runs from his center chest along one side at the same height as the main belt on the other side and joins back to the main belt at center back.


The smaller strap is an attempt to keep the weight bearing belt out on his shoulder, and prevent it from crawling up and pinching his neck (as any mom knows who as improperly worn a baby sling). To me it seems an attempt to partly correct the assymetrical design and even out the weight a bit. Assymetrical is uncomfortable. (As any mom knows who has worn her baby in a Shoulder sling vs a Mei Tai carrier). Especially given the weight of his shield, I think it would make more sense for Link to wear 2 belts like an X across his chest, riveted together mid-chest and mid-back. (I'm pretty sure I've seen this style in Skyrim).
But then maybe Link wants his sword arm's shoulder to be unburdened....beats me.

So both of these scabbard's strap systems are totally doable with leather brown belts, some leather straps, rivets, and a few metal rings and fittings.

 Now, to make the actual scabbards (the part that holds the sword)

THIS GUY (YE OLDE GAFFER) IS AWESOME.
www.yeoldegaffers.com FULL OF AWESOME TUTORIALS and COOL PICTURES

Ye Olde Gaffers made this and has a tutorial HERE
He shows you how to use simple slats of wood and your sword and some simple tools to make one of these. Then I found links to making your own chapes (the sword fitting on the tip of the scabbard HERE and HERE) So that's totally what I'm doing.

Once I have a sword.

So until then, I'm going to make strap systems that hold other things like pouches, shields, and quivers.

So it seems that Faramir's Quiver is simply a cyndrilical holder (holding a bag) attached to a simple loop belt worn slung over one shoulder across the chest.

Back View, NO CLOAK


Slung across the front, with cloak. Notice how it goes up over the cloak on one shoulder, and underneath the cloak on the other. Note how the strap is creeping up and digging into his neck (this is why Link had that extra strap.) Ofcourse the weight of Faramir's quiver is a lot less uncomfortable than the weight of Link's shield and sword. I think I'm going to improvise an extra strap like Link's to keep it from riding up like that. Plus extra straps just look cool.

 It comes through a slit in the back of his cloak to enable him to wear his cloak over both shoulders, but still have the quiver outside of his cloak. (the old backpack over or under a cloak conundrum)


 See how I highlighted the strap with red on the left image. It comes over his cloak on one shoulder, and then attaches to the quiver, and then into a slit in his cloak and around his body joining in a buckle on the chest.

So that should be relatively simple to make, its just a cylinder quiver with a single belt/strap that is attached at the top and middle of the quiver to keep it upright. (you don't want it attached at a single point or the quiver could very well flip over and dump your arrows out)
Something like THIS QUIVER TUTORIAL FROM THE AWESOME YE OLDE GAFFERS,

 But instead of the bottom strap attaching right at the base, it would be somewhere mid-cylinder. And ofcourse the cylinder part would be gussied up to look like Faramir's.

Faramir's belt is a regular belt but with a really wide fan shaped buckle.
From this incredibly useful site


This buckle allows him to knot the end. The belt also has a cool fitting on the end...

Cool Fitting
Also from the same incredibly Useful Website

Link's belt....
 Love the big roomy back pouches. I guess its a Medieval Fannypack.... kind of reminds me of Luke Skywalker's belt....


I definitely want to make a brown leather belt with pouches like this. I may make the pouches from canvas if I don't have leather. It's so useful, even if it is dorky...

Monday, December 30, 2013

Making Bracers/Vambraces/Gauntlets Part 3: Assembling the Bracers, How to make thin leather into thick leather (or at least act like it)

See Tutorial Part 1 and Part 2 here 


The 5 part tutorial is here.


Assembling the Bracers
STEP 1: Cut out your pieces
You will now cut out your bracer pattern in leather, in your 'sandwich filling' quilting medium (batting or felt or fleece. I found felt to be a bit stiff for me, and batting to be too expensive, so I used fleece. A fleece blanket actually...), and in canvas/broadcloth etc whose color roughly matches your leather. I was using brown leather, and I used a brown twill canvas that was already somewhat broken in (my favorite skirt in college...).
Leather, Canvas, and Fleece

STEP 2: SEW YOUR MIDDLE AND BOTTOM PIECES TOGETHER
Now I found that trying to assemble all 3 pieces together at once meant pieces shifting around, etc. which is a pain. Especially since even if you rip stitches out of leather you have a little trail of needle holes.
It saved a lot of time if I quickly sewed the filler/fleece to my bottom canvas piece first, so to make the next step simpler when I sewed it to the actual leather.

Ta-Da, Fleece sewn to canvas.
 Note, if your fleece sticks out a bit past your canvas, trim it to the canvas. Its like, we don't want the sandwich filling to be coming out the middle (especially in my classy bright blue) so we want the top and bottom sandwich pieces to be bigger than the filling.

STEP 3: SEW THE LEATHER TO THE CANVAS/FLEECE PIECE, LEAVING ONE SIDE OPEN
You'll want to put the "right sides together" which means, the side of your leather you want showing, against the canvas side. So on the outside you see the wrong side of your leather, and the fleece. It's like sewing a pillow case. And like a pillow-case, you'll want to leave one side open so you can flip it inside out.
I sewed across the wrist, down one side, across the bottom, and stopped at the other side.
Note, I left one side open.

STEP 4: FLIP IT INSIDE OUT, SEW DOWN THE OPEN SIDE
Now, we'll flip it inside out, (or rather, right side out).


Ta-da...now we'll sew down the open side.

Now its looking a lot more like a bracer. But note in the picture below how "puffy" it is, it looks like a sleeping bag, and not like a thick piece of leather.

Puffy sleeping bag effect.

STEP 5: TOPSTITCH IT ALL AROUND THE EDGES
This is where you make it look like a thick piece of leather. It will now behave like one piece, and less like a puffy sleeping bag with the opening sewn shut.

Top-stitched all around the edges.


No more puffy effect. Acts like a thick piece of leather.
 This technique works with thin leather for everything, even making hauberks out of thin coat leather. The trick is in the topstitching (and quilting does it even more) in anchoring the thin leather to a thick base, so it bends like its thick (and doesn't shift and wrinkle)
I should have used it more in Josh's Faramir 1.0 hauberk, instead I left it at the 'puffy sleeping bag stage' and so while the thin leather was attached to canvas, it wasn't anchored, and thus still shifted around and wrinkled when my son pushed on it.
Here, it looks great, because there's not little toddler putting stress on it.
Here, you can see how its wrinkling---because I didn't anchor it to the canvas properly. Thus when Isaiah stuck his hand there, he could get the leather to still wrinkle and look thin. If it were anchored better to the canvas, it would not have wrinkled.

In the next post, we'll cover quilting the leather, putting in grommets (without a hole punch...who has 1/4" hole punches lying around their house?), and weathering/dyeing it.


 COMING SOON....


VERY IMPORTANT TIPS FOR SEWING WITH LEATHER
First off, use the thin cheap(er) leather to quilt. You don't want to be forcing hauberk thickness of leather through your sewing machine. You can (with grit and determination) hand sew the thick stuff. Killing your sewing machine is not worth saving a little time. Test on a scrap, if your sewing machine sounds like its straining, don't do it. (Also, thick leather won't quilt very well anyway)

I CANNOT STRESS THE IMPORTANCE ENOUGH, OF USING A BIG NEEDLE. Thinner needles will bend (especially with all the layers of fabric, quilting etc) and cause you all sorts of tension problems. SO. NOT. WORTH. IT.
You can get a pack of sewing machine needles(6 needles) from Walmart for 2 bucks. There will be some size 11 (quilting cotton), some size 14 (jeans), and some size 17 or 19 or something (I forget).
USE THE BIGGEST ONE. 
I never paid much attention to needle size, and spent a lot of frustration on bent needles and messes of thread that ensued. This size 19 (or 17?) one has lasted me through 8 sets of bracers without bending so far. So much time saved.

Another thing sewing with leather (if it isn't all suede-like) is that the 'waterproof' side has friction issues with my presser foot. I could probably get some fancy foot that would fix this, or sew with a layer of tissue paper, etc, but all I did was sew with my cloth side up, and my leather side against the face-plate (which didn't have as many friction issues.)

I fiddled with stitch length, I liked something between 8 and 9 stitches per inch, it seemed to give a darker 'line' and thus seemed a tad more like tooling. (But not so tight that you essentially perforate the leather, and make it tear easily). Figure out what stitch length you want on a scrap, with the proper layers of quilting.

A NOTE ON QUILTING: It is essential that you don't quilt the lines too close together, or the design doesn't really have space to "puff" and look 3 dimensional. I found that when I quilted lines closer than 1/2" apart, the whole thing just went flat and boring.
Also, the design seems to puff up more as you vigorously rub it with shoe polish on a cloth when you are done quilting. If you don't want to dye or polish it, just rub it with a cloth at the end. It helps the whole thing fluff up and look cool.

Thursday, December 26, 2013

Making Bracers/Vambraces/Gauntlets Part 1: Drafting a Bracer Pattern based on Vambraces of Gondor

(All parts of the tutorial are listed here)

Step One: How to Draft Bracers.

In this post, I draft a pattern for the Bracers of Gondor.

So, I always wanted to make bracers, especially since I had been planning for ages to make Gondor Bracers for Josh's Faramir Ranger outfit, and Link Bracers for Josh's Link Outfit.
Sadly, I have no experience with tooling leather, and a very very limited budget.

Then I stumbled across Andrea Schewe's tutorial for her pattern for making quilted bracers on the internet, and was greatly encouraged. While they're a far cry from the Vambraces of Gondor, they look pretty cool, and sewing is something I know how to do.

I drafted my first pair on what seemed cool to me. I used canvas, felt, and broadcloath since it was just a test (all from my scrap box).

I felt awesome, but they kept crawl up my arm toward my elbow. I decided it was from my hand flexing backwards, pushing on the point.
See how it restricts wrist movement.
 And even worse, they uncomfortably stabbed into my upper arm (See below)
Restricts wrist movement, and pokes into upper arm.
These are both not nice things to happen in combat, shooting arrows, etc. Especially when they are made from stiff leather instead of fabric.

I had copied the the cool wrist point from the Bracers of Gondor, but on further study of those pictures saw that the point was resting below his wrist. (see below)
See how the "point" rests well below his wrist line.

So I decided to make a pair with a straight wrist, with a hand guard attached to it. I also decided to make them a little longer to keep them from crawling down my arms.
[insert pictures]
They were pretty awesome. The handguard rested a little too close, inhibiting my hand from bending backwards easily, but this is easily fixed by cutting both the wrist length, and the handguard at shallow U's where they meet, about a depth of 1/2"
[insert picture]

So they were awesome, they didn't crawl down, but I found (wearing them all day) that they hindered my movement as well, when I bent my arm about, doing things, they cut into my upper arm.
They were too long.
[insert pictures]
It was uncomfortable and I couldn't imagine wanting that in combat.


So I went off to the internet to do my research.
After studying lots and lots of pictures, this is what I found.

Bracers are a lot shorter than they look. They weren't as long as I had previously thought. They are made so as not to hinder the elbow when bent. They are even shorter on the underside.

In this shot of Faramir, note how the bracer's point comes well below his elbow, even as he bends his arm it barely comes to the joint line. Also note how the "tip" at the wrist rests below his wrist line.

See here, the underside of the bracer is even shorter than the top side, coming very well below his elbow

Here again, we see where the bracer ends in relation to his elbow. Note that there's a gap between his upper quilted pauldron, and his bracer, to give better movement at his elbow. This is a Ranger Outfit after all, light armor, sacrificing protection for movement, speed, and stealth.


Here again, we see how the underside of the bracer is even shorter than the topside. It maximizes movement


Here again, see how Faramir's Bracers underside compares to the topside
 After looking at tons of pictures, I decided that the underside of my bracer had to come at least a fist-width less than the measurement of my inner foream measured when my arm is at a 90 degree angle.
(This is important. How you hold your arm changes the measurement. Unless you plan to walk around wearing your bracers on your arms held out stick straight)
I also came up with some rough approximates of the dimensions of the the bracers of Gondor.
(I am counting the brown/grey underbracer and black overbracer together, since they are always worn functionallly as one piece, and the black overbracer worn without the brown/grey underbracer would give significantly less protection to the foream)


Here's a diagram for the measurements.

You'll also want to take the visual width of your fist. Make your hand into a fist, and measure across the knuckles at the widest point, with a straight ruler, to see how wide it looks. This is your visual fist width, which you'll use to get the dimensions for your Bracers of Gondor.

NOW REMEMBER TO ADD YOUR SEAM ALLOWANCE TO YOUR FINAL PATTERN. (I did about 1/2" all around the edges)

This will be your "base pattern" bracer. You can make overbracers with gaps in the lacing, your can do all sorts of stuff to it to modify it. I would suggest making at least one set of "underbracers" with the base pattern, to get a feel for how to do it, before trying other fancy stuff.
++++++
Here are more pictures of other kinds of bracers, which follow the same rules, that the bracers need to be atleast a fist-width away from your arm joint. Also, the unlaced bracer is wider than it is tall.
These beauties by the RiverPath on Deviant Art http://theriverpath.deviantart.com/
Note how it ends well before the elbow. Link's Bracer's by Aradani Costumes

See also, how this ends well before the elbow. The hand piece visually lengthens the look of the bracer. Thorin's bracers by Rassaku on Deviant Art http://rassaku.deviantart.com/gallery/

Note, to get longer bracers, the angle changes. The underside is still kept short (atleast a fist length from bend in arm) but the bracer keeps extending to look longer on the 'topside'. Warrior Greaves from Viking Shield.

Note again, how the bracer is even wider than it is tall, because the laced up opening is techinically part of the width.

Last of all, a way to get the long bracer look. This is a picture of Jedi Elf Queen's recreation of the metal vambraces of Haldir's Archers. They really capture the "long bracer" look, seeming to come to the elbow. Note, that the armor curves steeply down, preserving the short inner-foream length (at least a fist-width from the joint) while flaring out at the elbow to look long. I'll post a detailed tutorial on re-creating "long" looking bracers later.

All the parts of the tutorial are listed here.