Showing posts with label Freezer Paper Stencils. Show all posts

Monday, July 27, 2015

Tutorials in Stenciling with Fabric Paint: Method 4: Overhead Projecter sheets burned with an Electric Stencil Cutter.

I am reviewing the 5 main methods I have for embellishing fabric with stencils and fabric paint. I go through the pros and cons and what I have learned with trial and error for each one.
  1. Freezer Paper cut with a Utility Knife
  2. Stencil Blanks (Showoffs at Hobby Lobby) cut with a Utility Knife
  3. Stencil Blanks cut/burned with an Electric (Heat) Stencil Cutter or Woodburning Tool
  4. Overhead Projector sheets cut/burned with and Electric (Heat) Stencil Cutter or Woodburning Tool.
  5. Cheap Screen Printing ideas
This method is by far the easiest, once you get the hang of it. There is no hand-cutting involved, and you can pretty much draw the stencils with the hot cutting tool.

Materials required: 
  • Electric Stencil Cutter/Burning Tool ($10-15)
  • Glass Pane/Old Picture frame (very important!!)
  • Transparency film (for overhead projectors, 100 sheets for $15)
  • Fabric Paint (Either Tulip Soft fabric paint, or mix the appropriate color from those 2 oz. acrylic paints at Walmart or any craft store and mix with textile medium at a 2:1 ratio)
  • Cosmetic Sponges for sponging on the paint (24 wedges for $1 from dollar tree, a lot cheaper than from a craft store)

Stencil burner, basically, you want a really fine point (at an angle is nice). I got the "Show Offs" Stencil Cutter from HobbyLobby for 15 dollars, with the coupon, 9 bucks. There are 4 tips of various kinds, which I only use the precision tip for stencil cutting. THe other stuff looks like it might be fun to use for woodburning, as this is really just the same thing as a pyrography/woodburning tool
The "precision tip" on my stencil cutter was a tad too thick, so I then sharpened the soft brass to a complete point with my (aluminum oxide) knife-sharpening stone in 30 seconds.
Stencil Burner Precision tip

I think Plaid Stencil Burner may be naturally sharper, but it was very easy to sharpen the tip myself. You could probably use a Pyrography tool too. I like the angled tip, and the sharpness.

One hint, let it heat up for a good 10 minutes (on the little stand that comes with it) before stencil cutting. The instructions say 5 minutes, but 10 is way better. Also, if the tip unscrews while you are working, just screw it in tight with little pliers and keep going. No point in letting it cool off and rescrewing it with your hands, pliers on hot metal is just fine.

I got  these ones from walmart. (School Smart without Sensing Stripe) It seems the ones "without sensing stripe" are a lot cheaper. I got 100 sheets from walmart for 15 bucks. You can also get them from Amazon or an office store. You shouldn't be paying more than 15 cents a sheet (some brands or ones that are meant to be printed on by a machine are much more expensive. Get the write on ones, they work fine)

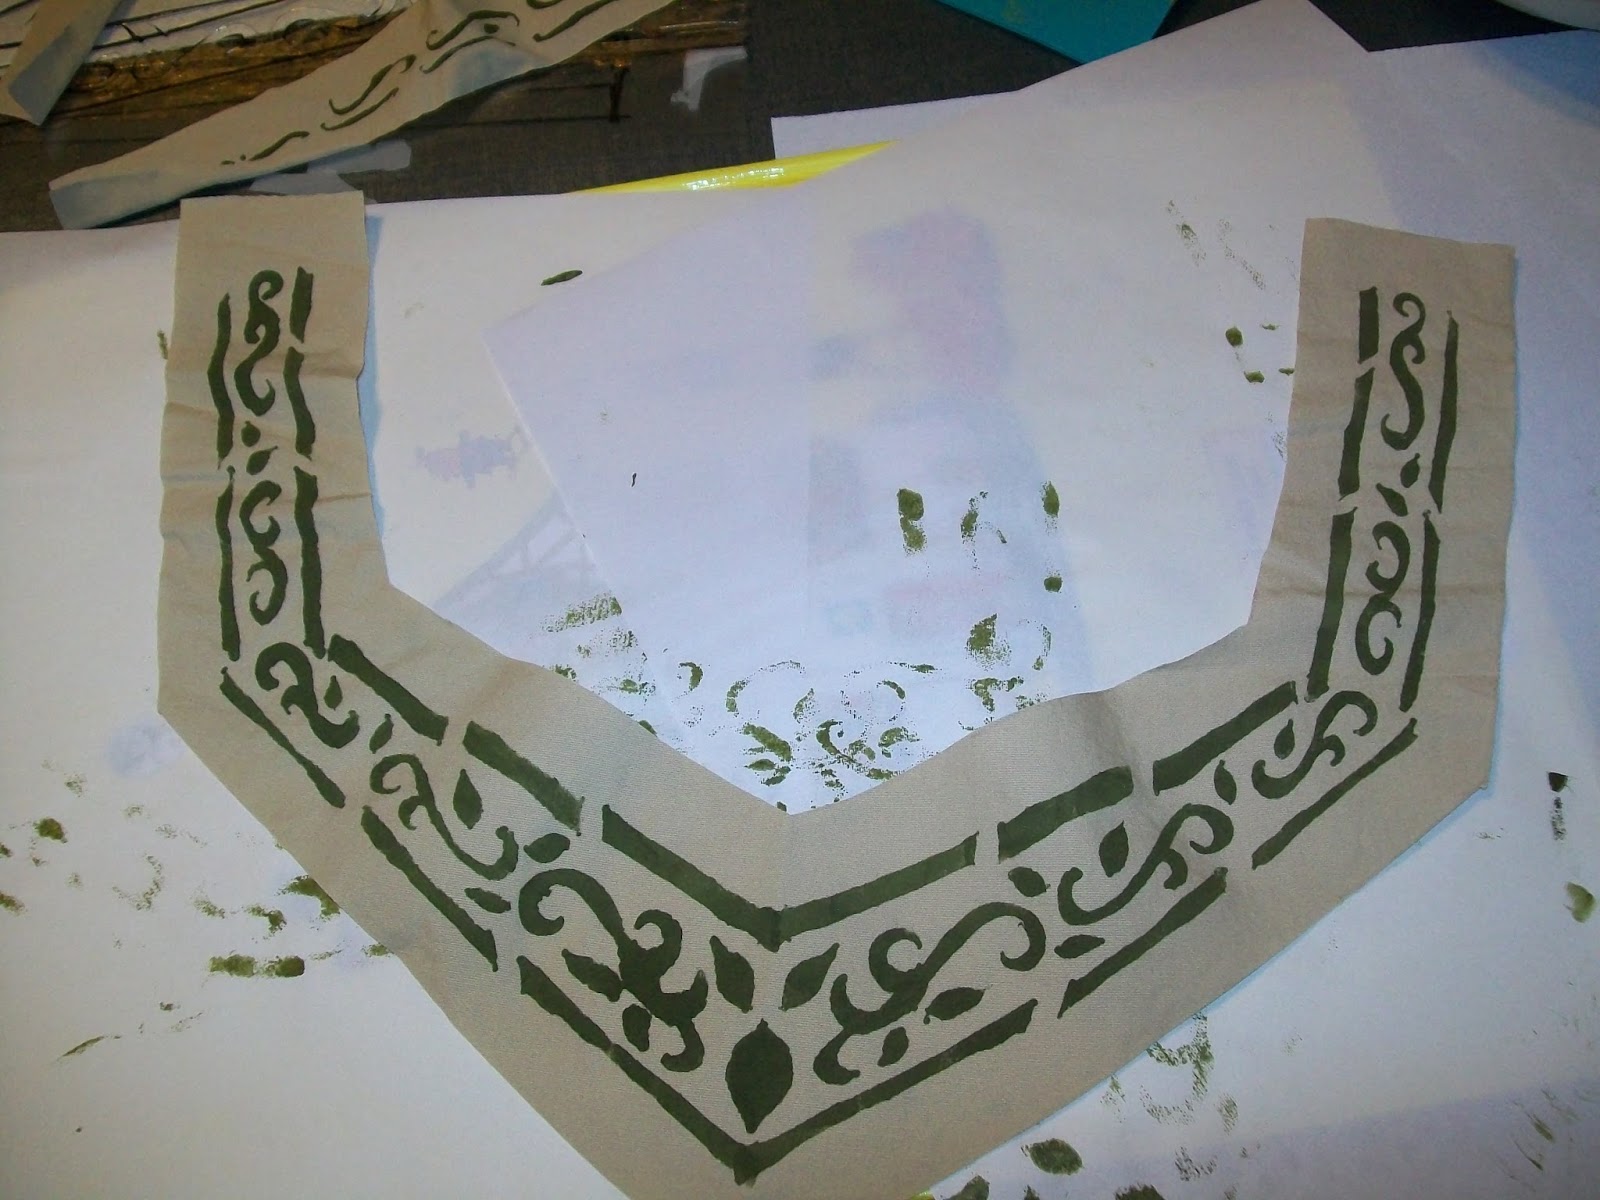
First I traced my pattern pieces (I was lazy, so I just traced half of the neck facing, and am going to flip the stencil over to do the right-left sides.) with permanent marker, and then drew the design I wanted.

I then (after letting my stencil cutter heat up for 10 minutes!) simply "drew" over the lines to cut out my design.
!!!!IMPORTANT TIP!!!!
Have your projector sheet lying (firmly!) on glass. I used to try having a paper under it, and it dissapated the heat funny, or made the sheet puff up in places imperceptibly, that REALLY messes up the whole process. I kept getting imprecise cuts, which I finally realized was the film kind of slipping up off the glass toward the burning tip as I cut, causing hunks of the sheet to burn away in sloppy lines. You can get pretty crisp lines as long as you keep the plastic as flat as possible on the glass, and kind of "carve" through the melting plastic with only the tip of your stencil cutter---the tip should be scraping the glass through the plastic sheet.

After its been burned through.
Why overhead projector sheets and not "Show Offs" stencil blanks? Because stencil blanks, to be more sturdy, are much thicker. There's a lot more melting plastic to cut through, and globs of melting plastic messing up your lines. I haven't figured out a way to cut clean, good lines through stencil blanks yet. The transparency overhead projector sheets are much thinner, and you get crisper lines, and less melting plastic to cut through.
Remember, you are really tracing the pattern right through onto the glass, to get a clean line.

Overhead projector blanks are kind of brittle (not tear-resistant like mylar stencil blanks) and tear easily, so I didn't bother with spraying stencil adhesive to them like I do with the mylar stencils (because when pulling them off the fabric, all my twisty vine parts can tear easily) This makes them more prone to fabric paint bleeding, getting less crisp lines. But its SOOO fast.

Here is me stenciling. Its easy too, you just get those cheap cosmetic sponges (24 wedges for $1 from dollar tree) and one wedge lasts through an entire hour of printing.

Here I mixed up my own fabric paint, first getting the color I wanted from those 2 oz. acrylic paints at Walmart or any craft store and mix with textile medium at a 2:1 ratio, in a corelle bowl. (When cleaning up the bowl, baby wipes cleaned it out nicely, before putting it in the dishwasher. You don't' want to rinse acrylic paint down the sink, it clogs drains)


I just squirt my fabric paint onto a yogurt lid (or mix it up in a bowl, and then dollop some on the yogurt lid).
Then I get some paint on my wedge sponge, and then dab it a bit on the yogurt lid to make sure its not too loaded with globs of paint (so you don't get bleed through).


Then sponge it on, while holding the stencil down with your other hand. Remember, the key to crisp lines and less bleed through is to do a couple light layers (a little paint goes a long way in sponging!) and not one thick heavy layer.


Here I'm doing a metallic gold paint on a navy fabric.
here I am going to do an olive green paint on a tan fabric.

Then you carefully lift the stencil. Let it dry. Then heat set it with the iron (and a thin cloth on top) for 30 seconds.

 (I've found the non-metallic paints are kinda wetter and bleed through more, so I backed the fabric with paper on top of a hard surface to soak up an paint that got through the fabric)


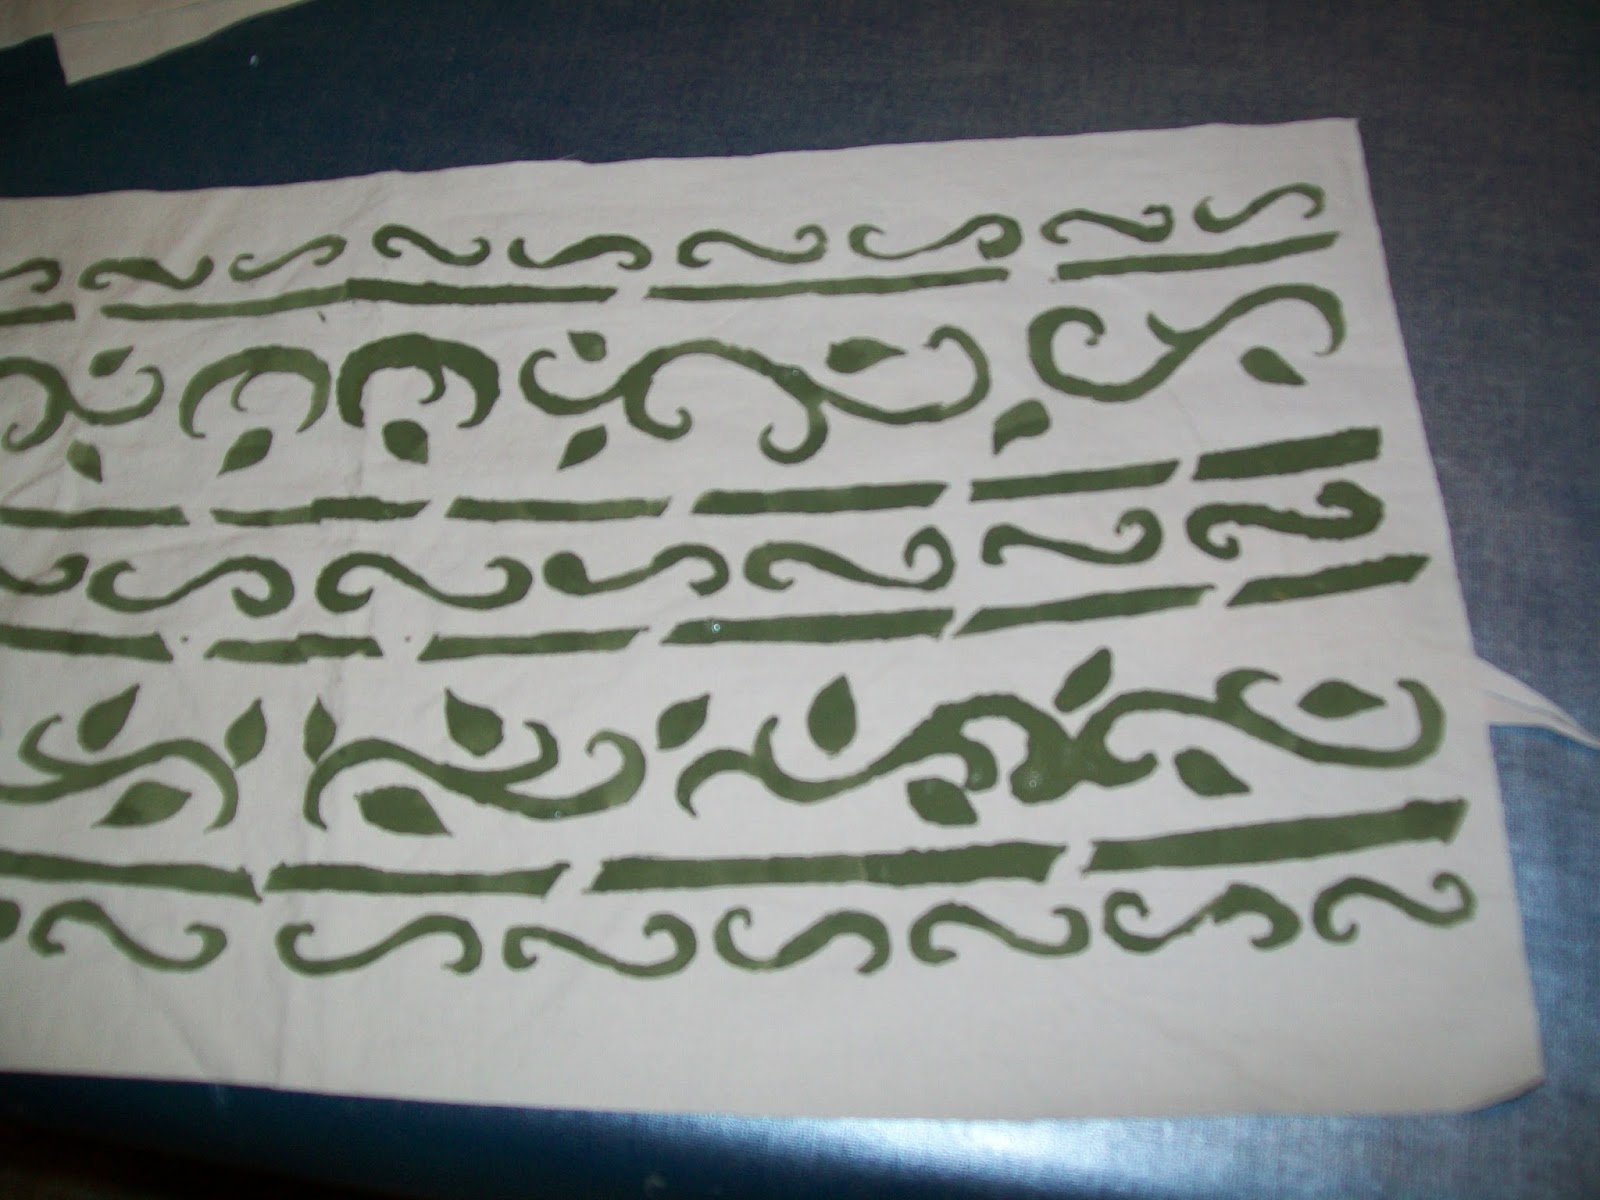
You can see that this method is kind of "rustic" looking. Its not as crisp as using freezer paper, or mylar stencils with stencil adhesive. But its SO FAST---both to make the stencil, and to print.


Also, if you have a long piece, don't try to just tape edges of sheets together, you get bleed through. Oh well.

PROS: 
  • Very fast to make the stencils, with very little effort, you are just sort of drawing them on once you get the hang of it.
  • Also very fast to use for printing.
CONS: 
  • Not as finely detailed/crisp as stencils cut with utility knife.  
  • Because the lack of adhesive, your printed fabric won't have as crisp lines either. It looks more "rustic". But I kind of like that old printed look.
  • Hard to clean---- I haven't had much luck with cleaning the stencils yet, as they are kind of brittle plastic (so no scrubbing them!) but with one set of stencils got at least a 18 number of printing runs out of them, and probably have a good 15 left in them, before the residual paint messes up the lines. Also bear in mind though that I was using non-metallic fabric paint for these runs, the gold metallic paint clogs them more.

Overall, after finding out how easy this was, this will be my go to method for testing out a design, to see if I really like it. Like with these, I realized I really like my center stripe design, but not as crazy about the border.

Also, this will be my go to method for doing hem border prints---anything where very crisp lines aren't as noticeable. So here, down on the hem of a garment, and its so much easier.

Thursday, July 9, 2015

Stenciling with Fabric Paint: Method 1: Freezer Paper Stenciling

I am reviewing the 5 main methods I have for embellishing fabric with stencils and fabric paint. I go through the pros and cons and what I have learned with trial and error for each one.
  1. Freezer Paper cut with a Utility Knife
  2. Stencil Blanks (Showoffs at Hobby Lobby) cut with a Utility Knife
  3. Stencil Blanks cut/burned with an Electric (Heat) Stencil Cutter or Woodburning Tool
  4. Overhead Projector sheets cut/burned with and Electric (Heat) Stencil Cutter or Woodburning Tool.
  5. Cheap Screen Printing ideas

Method 1: Freezer Paper Stencil, Cut by hand with a Utility Knife 

Materials required: 
  • Freezer Paper
  • Iron
  • Utility Knife
  • Glass Pane/Old Picture frame (SOO much better than self healing mat or wood or posterboard!)
  • Fabric Paint (Either Tulip Soft fabric paint, or mix the appropriate color from those 2 oz. acrylic paints at Walmart or any craft store and mix with textile medium at a 2:1 ratio)
  • Cosmetic Sponges for sponging on the paint (24 wedges for $1 from dollar tree, a lot cheaper than from a craft store)
Simply trace the design onto the non-shiny side of the paper, cut it out with the utility knife on the glass as a cutting mat, and then iron the paper (shiny side down) onto the fabric.
Use the sponges to apply the fabric paint, let it dry, peel off the paper.
When its dry, put a thin cloth over the design and iron it for a minute to set the paint.

I tried my hand at stenciling with Freezer Paper very successfully, I made decent Penguins Logos on the kids T shirts for Josh's father's day present.

I am proudest of the hockey blades, and the gloves.
But each stencil could only be used once since you have to iron on freezer paper to the fabric.

I have gotten 3 uses out of a freezer paper stencil that was a much simpler design (A Simple Tree of Gondor), by carefully pulling it off and re-ironing it. But the design looked sloppier by the 3rd shirt---the stars were just sad.

Anyway, with something with the level of detail of the Penguins logo, 1 use was all I was going to get, and each logo took me at least 2 hours of cutting.
 NOTE: I cut them on a soft wood cutting mat, which was a mistake (and made it take a lot longer). If I had cut it on a glass cutting mat (picture frame) it may have gone a lot faster.


PROS
Very High level of detail possible. You can cut very thin lines as the paper has very little thickness, the sponge reaches all the areas very well. You can even iron on separate pieces that don't have to be connected (like a traditional stencil) and they stay in place for the printing. Also, ironed on stencil holds very well to the fabric, making crisp fine lines possible.
Also, NO CLEANUP REQUIRED for the stencil. Which is a bigger deal than it sounds like. Also, with 150 square feet of the stuff for 6 bucks at Walmart, it is "very economical."

CONS
You really only can get 1 use out of it (unless the design is VERY simple, and you pull it off very carefully, then you might get 3, but it will degrade a bit). So it really is a one shot deal.

(We love you Penguins Franchise, Josh got an officially licensed Penguins T-shirt. We are just poor fans.)
Conclusion: This is the go-to method for anything with a high level of detail. It is also the go to method for anything that you want to be unique, one of a kind, etc. You can buy freezer paper at walmart orders of magnitude cheaper than it is at craft stores.


Tuesday, July 7, 2015

Stencil Making Tips (for Stenciling Fabric Paint)


BIG STENCIL MAKING TIP
I love embellishing things. I love stenciling, because its gives a really big "bang" for the time invested.

Recently, I stenciled the embellishment on the girls' elven dresses, a process I outlined here.
However, my hand was cramping up at the end of all that cutting. But now I have a solution!


BIG TIP: Use an old pane of glass as a cutting mat!

I spent wayyy too long laboriously cutting out stencils and my hand hurt for 2 days. It was because I cut them on wood (or layers of poster-board) as the cutting mat. The point of my utility knife cut through the plastic stencil into the soft wood/poster-board, giving it a lot more "drag" as I pressed and pulled the knife.This is what wore my hand out.
I have heard "self healing cutting mats" also give a lot of drag to the knife (because they are a kind of rubbery texture) and do this too.
I went through utility knife blades quickly, 1 edge per stencil, because cutting through all that matter was dulling the blades. I also had to pull really hard, resulting in parts where I accidentally jerked and cut more than I intended.

GLASS AS A CUTTING MAT IS SO MUCH BETTER!!!(An old picture frame works great)

I researched cutting mats, but from what I read about the "self healing" ones, it just would be the same problem. Then I read about glass ones. So I went to the thrift store (they sell them at the dollar store too, but you can get bigger ones at the thrift store) and got a big glass picture frame (with a picture of giraffes btw) for $2. Cutting on it was like a dream. The utility knife just cut through the stencil plastic, and barely scratched the glass (it will scratch the glass, so don't pull a picture frame off the wall). There was very little "drag." And so much less pressure on my hand.
If I had done this before, I probably would never have bothered buying the electric stencil cutter....

My analysis and tips of the 5 main methods I have tried of stencil making. I will be doing a post on each one.
  1. Freezer Paper cut with a Utility Knife
  2. Stencil Blanks (Showoffs at Hobby Lobby) cut with a Utility Knife
  3. Stencil Blanks cut/burned with an Electric (Heat) Stencil Cutter or Woodburning Tool
  4. Overhead Projector sheets cut/burned with and Electric (Heat) Stencil Cutter or Woodburning Tool.
  5. Cheap Screen Printing ideas

Sunday, April 12, 2015

Elven Baby Dress Progress 2: Stenciling the Embellishments.

I wanted to embellish the dresses with some vine-leaf motif gold design.

Not wanting to spend $$$ on trims that don't wash out mashed-up banana easily (I want to actually put the kids in these on a daily basis and throw 'em in the washing machine), I decided to make my own.

Not wanting to spend hours stitching embroidery, I decided to just use fabric paint and stencils.

Jenny was helping me steady it for the picture...

Not wanting to hand cut stencils from freezer paper that I could only use once, I opted to cut the stencils out of stencil blanks.
First, I traced my facing pattern pieces, then I freehand drew my designs onto them with a sharpie.

Then I cut them out with a utility knife. The stamp blanks are quite sturdy ("Show-Offs" 8x10 value pack, 12 sheets $7, before coupon) and  hard to cut.

Cutting all those little vine-like curves with enough pressure to get through the plastic, but not enough to slip and ruin the design....and then having to recut them and sorta pull them out with the tip of the utility knife...it's painful. And slow. And my hand was cramping up.

And because I am a total idiot stubborn, I decided to cut out a stencil for each yoke size (3-6mos, 12-18 mos, 2-3T).
It took me at least good 6 hours adding up all the times I was working on it, I think.
I went through 2 blades with 3 neck yokes and 1 section of belt trim.

My hand hurt and I was vowing never to do this again. And then I printed the designs (just taped down the stencils with painter's tape, and sponged on Tulip fabric paint with cosmetic wedge sponges from dollar tree).


And I felt better.

Note: If you want your lines to be "cleaner" (and you can also cut a lot finer lines too) then you should use freezer paper, that you can iron on (just showing how intricate you can get with freezer paper, see how I recreated the Penguins logo on these shirts), or maybe try doing mylar stencils with a spray-on re-positionable stencil adhesive (I think I shall buy some, and review it).
But honestly, I kind of like the home-made "woodblocky" printed look of my mylar stencils...

2nd note: USE A SHARP UTILITY BLADE. Cutting with even a slightly dull blade is torture. I used 2 blades (they're double sided) to cut out 4 intricate patterns, so kind of a new sharp edge for each. This adds to your cost, but replacement utility blades are 33 cents a piece, so its really worth it in the end.

3rd note: notice that I broke up the framing lines into sections. If you don't do this, the whole thing kinda puffs up and leaks more when you are sponging on the paint. I learned this the hard way.

4th note: If you want to save your hand some work and some time, perhaps you should try using a stencil cutter. I think I might just go out and buy one now, I will review how it works form me when I do.

5th note: If you actually own one of those wonders called a sillhouette stencil cutting machine, than this whole thing will be a breeze for you :)


Monday, September 22, 2014

Making My Room Like Rivendell part 3: Thoughts on Making Elven Banners


I must make this. applique trees and leaves etc (w/ heat n bond, I have no shame. The elves probably had cool stuff) maybe outlined in silver stem stitch? Definitely do the scrollwork with couched silver cord.


Just looked up some more pictures. They totally used paint. Guess that's medieval enough. I guess I will too. Def not puff paint though....

Definitely paint there....

Ok, so just looked at these helpful links of other fellow banner makers on alleyscratch

After looking at various recreations, I realized my favorites were ones done on a sort of matte fabric surface, they somehow looked less costumey to me than the ones done on satin (perhaps this is all the fault of flash camera...)

This was my favorite
Arwen's Banner by Sidhe on Alleyscratch
 Which was done completely with paint on fabric. She did it for her wedding decor, and afterwards hung it up in their room, which I thought was very cool.....

Then there was this one, done with heat n bond and lame applique, and details in a silver paint pen.
Elvish Banner by Sarah (Aranel13) on Alleyscratch
I lover her speckled stars look, it just looks So. Incredibly. Awesome.

 This one's pretty cool too....
(Leah on Alleyscratch)

Done with fabric applique with fusible interfacing.

So I think I shall do fabric paint, with stars cut out of lame and appliqued. Because they are geometrical and easy to cut out :)


I remember than Joan of Arc referred to the making of her banner as hiring someone to "paint" her banner, so it must be authentic.

So paint, here I come....

(Although I know Arwen sewed Aragorn's standard....so there's that....maybe I'll embroider it a little bit....)

So I am planning to probably do a rendition of Arwen's banner.

Although make the trees more like the trees on the gates of Moriah....


And do it on a blue-black matte fabric, with speckled stars on it like Sarah Aranel13's elven banner above....

And a Gondor banner, ofcourse. I need a Gondor banner. I am planning to paint some sort of elaborate medievalish looking border on it, all in silver.
Some mix of the below designs....


I think Tolkien would approve.

Saturday, August 2, 2014

Freezer Paper Stencils! Penguins Logo and Gondor

Penguins and Gondor, both close to our hearts....

My magnum opus. So proud. A couple hours with a utility knife, an iron, fabric paint, a black shirt, and viola, I had a father's day present for Josh.