Thursday, April 30, 2015

Baby Elven Dress Almost Finished

More pictures of the dress with belt here.


So I finally sewed up the little elven dress. It was made out of a men's T shirt, so the edges didn't need finishing.
Previous mosts on the making of, here, and here.

I'm pretty happy with it, just wish I'd lined the bell sleeves so they drape better.

Keziah (13 months in a week) was not happy about being crammed into a 6 month sized baby dress for pictures. It's ridiculously short (for an elven dress) on her.


A PICTURE WITH HER SMILING!!!


The Outtakes. She did not want to wear the circlet. And she thought this whole picture taking adventure was silly to start with. Keziah does not like being in photoshoots....


This is my favorite Outtake....


Her expression says it all....


Monday, April 27, 2015

The State of Sewing....

So, fired up about the SHB sewalong,  I was full of plans of Baby Ranger outfits---analyzing how to make baby ranger boots, and baby hauberks.....

And baby elven dresses....

And ofcourse, the Arwen-Inspired nursing dress for myself.

And then I got the flu (again?). At least I think that's what it was. I was so sick, I sort of just crawled around with a cold-pack on my forehead, chugging kool aid, begging God that I wouldn't throw up (I didn't!) for 5 days while my mother in law watched the (sick) kids.
All in all, I lost over a week, and I didn't even have energy left to look at the sewing machine for a bit. But my strength is returning, slowly.

So, no SHB sewalong updates yet (hey, I've got 3 days!)

Like this. Except floaty and white and chiffon and lace....
On a different sewing front (and much more important) I had promised a very dear friend I would sew Lord of the Rings inspired sleeves onto her wedding jacket, and with her wedding coming up, I had to just do it and stop planning. I had cut out mockup sleeves, and played around until I got proportions that I thought worked. (Note to self, chiffon kind of re-defines itself after you cut it. So cut conservatively, and then take off more from there....)
(I ended up doing oblong semicircles 25" by 35" long. The sleeve hole was 4"x4". Seam allowances, plus allowing for some "reshaping" of the chiffon as it hangs, make this about right)

So I had a pattern. That was the first hurdle.

Tonight, I just knew I had to cut out the real thing and do it before I psyched myself out.

Pretty circular hems on chiffon!!
I got through the second hurdle, sewing circular hems on chiffon that are actually pretty. I got the tutorial from this website (which for some reason is having trouble right now? It really had the best tutorial for sewing with chiffon....) Here is my pin with the picture that is important. It's just a simple circular hem, folded over and sewn a second time to enclose raw edges. The key between this and my previous, somewhat sad, circular hems on chiffon, was folding over a fat 1" seam allowance, but sewing close to the edge (like in the picture). The fat seam allowance, ironically, allowed me to trim the seam very close to the stitching, which is what ensures and nice even second seam.
(normally I hate making fat seam allowances, especially when I'm just going to trim them off and throw them away, but here it is essential. I tried doing this with just sewing "thin" seam allowances to start with and it didn't work)

I also finished the interior seams in the chiffon, by sewing a thick seam allowance, trimming one side close, and then folding over the other and sewing the edge with a zig zag, also a tutorial on that website. TUTORIAL PICTURE HERE.

See my pretty finished interior seams!!!
So, now to the third hurdle, sewing the upper and lower sleeves together and onto the jacket.

Then will come the fourth and final hurdle, which will be hand sewing lace to it. That's going to be the fun part :)

Sunday, April 12, 2015

Elven Baby Dress Progress 2: Stenciling the Embellishments.

I wanted to embellish the dresses with some vine-leaf motif gold design.

Not wanting to spend $$$ on trims that don't wash out mashed-up banana easily (I want to actually put the kids in these on a daily basis and throw 'em in the washing machine), I decided to make my own.

Not wanting to spend hours stitching embroidery, I decided to just use fabric paint and stencils.

Jenny was helping me steady it for the picture...

Not wanting to hand cut stencils from freezer paper that I could only use once, I opted to cut the stencils out of stencil blanks.
First, I traced my facing pattern pieces, then I freehand drew my designs onto them with a sharpie.

Then I cut them out with a utility knife. The stamp blanks are quite sturdy ("Show-Offs" 8x10 value pack, 12 sheets $7, before coupon) and  hard to cut.

Cutting all those little vine-like curves with enough pressure to get through the plastic, but not enough to slip and ruin the design....and then having to recut them and sorta pull them out with the tip of the utility knife...it's painful. And slow. And my hand was cramping up.

And because I am a total idiot stubborn, I decided to cut out a stencil for each yoke size (3-6mos, 12-18 mos, 2-3T).
It took me at least good 6 hours adding up all the times I was working on it, I think.
I went through 2 blades with 3 neck yokes and 1 section of belt trim.

My hand hurt and I was vowing never to do this again. And then I printed the designs (just taped down the stencils with painter's tape, and sponged on Tulip fabric paint with cosmetic wedge sponges from dollar tree).


And I felt better.

Note: If you want your lines to be "cleaner" (and you can also cut a lot finer lines too) then you should use freezer paper, that you can iron on (just showing how intricate you can get with freezer paper, see how I recreated the Penguins logo on these shirts), or maybe try doing mylar stencils with a spray-on re-positionable stencil adhesive (I think I shall buy some, and review it).
But honestly, I kind of like the home-made "woodblocky" printed look of my mylar stencils...

2nd note: USE A SHARP UTILITY BLADE. Cutting with even a slightly dull blade is torture. I used 2 blades (they're double sided) to cut out 4 intricate patterns, so kind of a new sharp edge for each. This adds to your cost, but replacement utility blades are 33 cents a piece, so its really worth it in the end.

3rd note: notice that I broke up the framing lines into sections. If you don't do this, the whole thing kinda puffs up and leaks more when you are sponging on the paint. I learned this the hard way.

4th note: If you want to save your hand some work and some time, perhaps you should try using a stencil cutter. I think I might just go out and buy one now, I will review how it works form me when I do.

5th note: If you actually own one of those wonders called a sillhouette stencil cutting machine, than this whole thing will be a breeze for you :)


Thursday, April 9, 2015

Elven Baby Dress and Tunic Progress Post 1: Cutting the pieces

Baby dress pieces, all cut out.

I was working on my next goal for the Small Human Being Sew-along: Elven Baby dress and Elven Baby Tunic.

And because my new motto is "mass-production," I decided when making the baby ranger tunic to make a matching tunic for Isaiah (3-4T). And because I noticed it takes me a few times to get it right, I decided to make matching Elven dresses for Jenny(2-3T) and Keziah(12mos) to go along with the baby's one.

My resolution to do mass production was when I realized I can get a lot more done for the time sewing, if I sew similar things all at once...the same way I save time on dishes when I wash all the bowls at once, then all the cups, etc.

For the baby tunic and dresses, I just traced off a baby onesie (although, after making a dress that only fit a newborn doing this technique, I usually trace generously. Store-bought knit onesies are a lot stretchier than T-shirt knits that I sew from recycled T shirts), and lengthened it to where I thought it Should be.
The front pieces of the baby ranger tunic, the thing on the left is the sleeve.

I cut out it out of a Green T-shirt I got at the thrift store, and the facings out of a brown T shirt from the aforementioned thrift store. (I split the front pieces because I've found its the easiest way to sew the notched neck facing, for me)

The baby elven dress is sort of self-explanatory here.


I tried to just scale this up for the 12mos dress, but found I couldn't make that wide swishy skirt using a single XL tee (wasn't wide enough). So I just traced off the 12mos flared out to the appropriate length.
I did the same for the 2T dress, but when holding up the pieces on my (tall) daughter, it just wasn't ankle length...and this dress feels like it should be a "gown" with the bell sleeves and all, so I cut into a 2nd T shirt to sew on 5 more inches for the bottom.

Here are my initial plans


Keziah turns One, and shows her skills with a walker...

So Keziah turned one year old....


Grandma made the cutest cupcakes you ever saw....Jenny calls them "chickee faces."


Keziah got a board book she was very excited about.


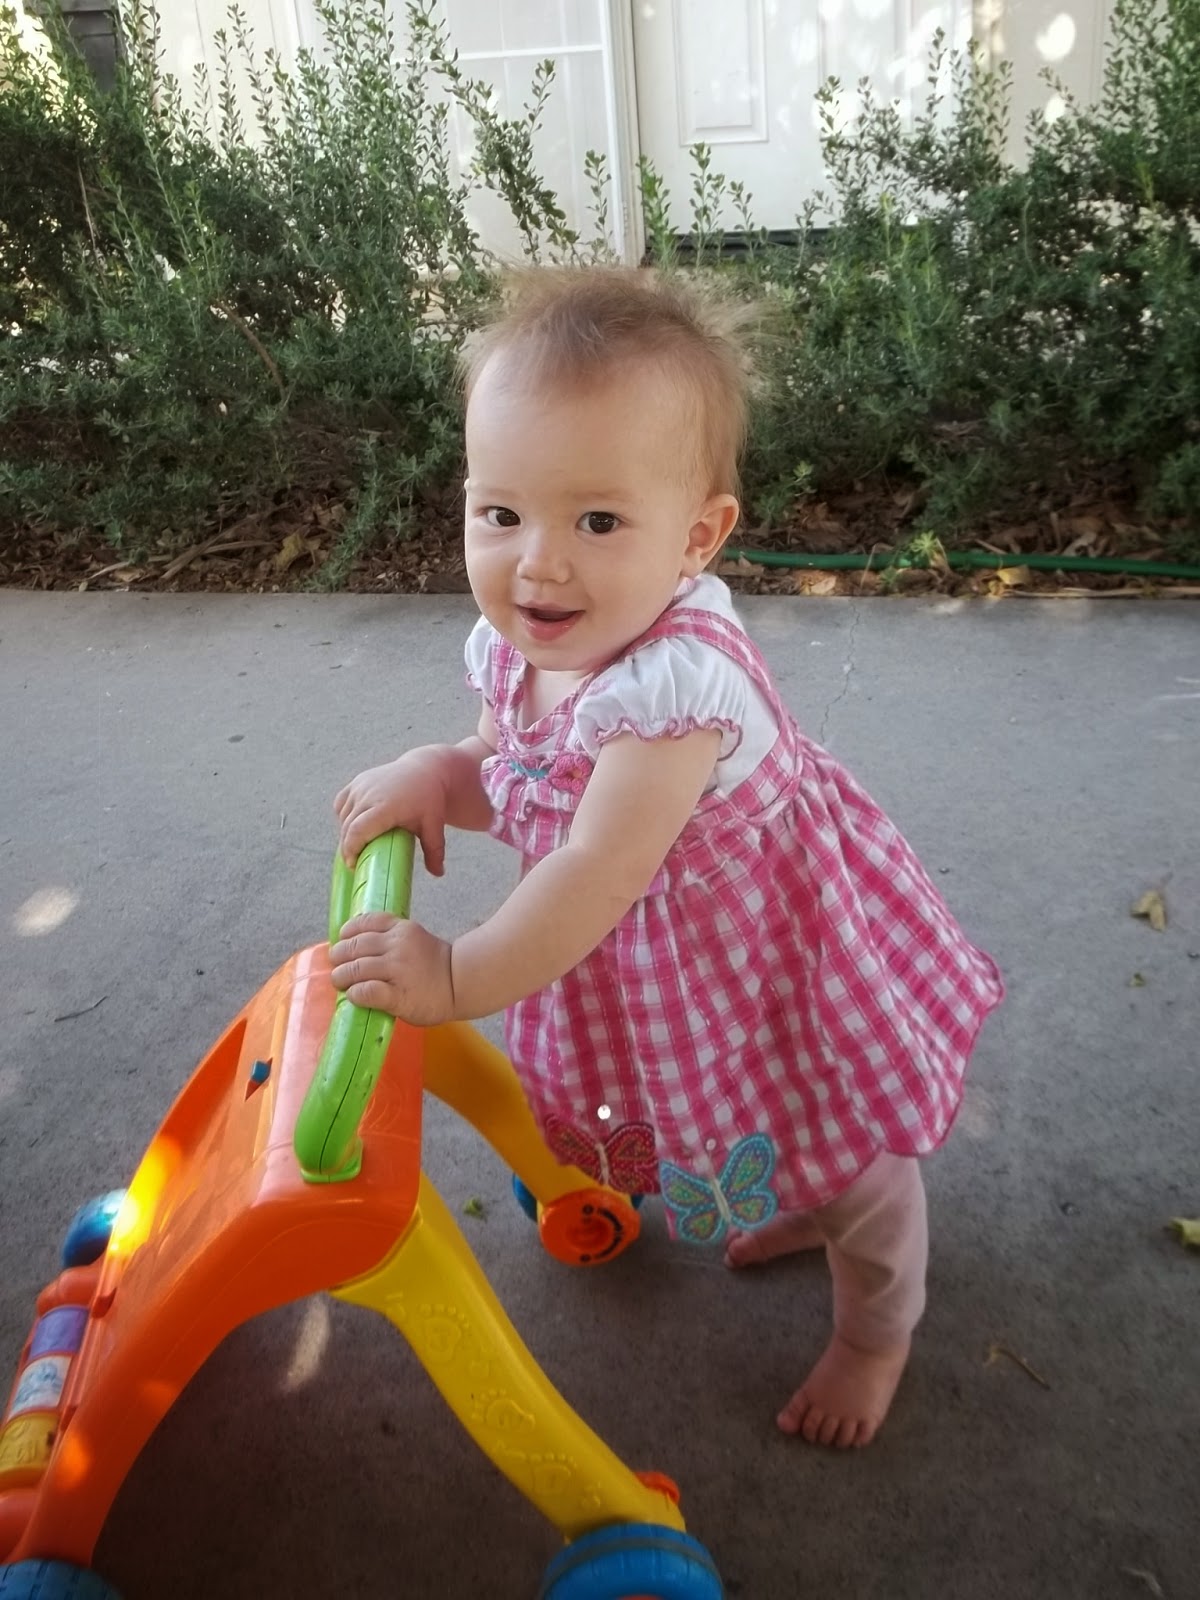
She seems unaware of her great accomplishment.

She's been kinda moody though...
Like responding with indignant crying to the whimsical commands of her mother, such as "Kuzzles, don't hit mommy in the face", or "Kuzzles, no pinching" or "Kuzzles, no biting"....

She remains incredibly sweet though, and at odd moments will crawl away from her playing to rest her head on your lap for a few seconds, then catch your eye and smile, before going back to her play.

Isaiah's imagination continues to brood on stories, but he at least is letting us be part of it now, as he quotes bits and waits for you to quote back the next line, upon which he continues, and sees how long you can go.


His moral development is also coming along, as now, he doesn't just steal fruit when he finds it. Today, I had been washing the grapes, and after purloining some when my back was turned, he came up to me, joyfully holding the grapes, and said "MOMMY, THANKYOU!!!" with the most beatific smile, as he walked off to eat the grapes.
He wanted to be above board and give me a heads up. Now if only we can teach him to ask first...
He told me a story this morning, as he climbed into a cardboard box that the cats have been enjoying.
"Isaiah says, 'Chloe [one of the cats] can I sit in the box?' 'Chloe says, 'yes, Isaiah, thankyou' 'Isaiah says 'You're welcome Chloe!'"

We're still working on the proper order of 'thank you' and 'you're welcome'

Jenny has also been talking a lot recently, she told me a story too. "Jenny was in the backyard, and there was flies. And Daddy came and killed the flies. And Jenny was happy."

Keziah continues yelling.


Jenny continues being the Susie Derkins to Isaiah Calvin. Isaiah burst out with (at dinner) "Are you a dog?" I think, a reference to the David and Goliath video they've been watching recently.
Jenny answered. "No. I am not a dog. I am a guwl"

They love to chalk on the pavement. Except they want me to do all the actual chalking. They prefer to be the artistic vision behind the apprentice, as they order what colors and things they want. (Now dwaw a pink daddy stormtrooper. Now dwaw a yoda wiv a gween lightsaber. Now dwaw a white fish. Now dwaw a pink cat...")
They will give orders as long as I still have a piece of chalk in my hand. These sessions usually end with the apprentice throwing down the chalk and begging the masters to draw their ideas themselves, but they have yet to comply.


They also like playing the piano. It actually sounded quite good, with all 3 of them playing.


Jenny got her "pink spway bottle" and some cleaning rags, and carried them around.


Kuzzles was showing off her mad skills with the walker. Actually, she was quite driven, charging ahead with her little walker, stopping only to smile briefly and then continuing with her mission. She doesn't know how to steer it though, and would inevitably get it stuck on something (trees, chairs, rocks, siblings) and then start to complain loudly until the obstacle was removed. Then would instantly start charging ahead again.


Tuesday, April 7, 2015

Arwen's Bloodred Gown or Requiem Gown: Planning and Studying


I was too tired to really make anything today (well, other than take the kids grocery shopping IN MY GONDOR MEI TAI CARRIER and changing diapers), so I spent up my valuable free time writing this post and looking at pictures.
(Something I have found, is if I want to actually make something, I must not connect the internet or turn on my computer that day.)

My last-priority of the 'SHB sewalong' projects (which is in fact, not for a SHB...although I suppose being a maternity version, the SHB is inside it somewhere...) was a nursing-maternity dress inspired by Arwen's Bloodred dress/Requiem dress from Lord of the Rings movies. (As I have noted before, Arwen's gowns make great maternity dresses...)

So now, a write up and analysis of all those pictures I've saved to my computer from hours and hours of wasted time on the internet, most of done years ago.

Firstly, the bloodred dress is just a better fitting (to the actress) version of the requiem dress, but in different colors.
Note:


Not falling off.
Falling off.
They're fundamentally the same except the requiem dress looks 2 sizes too big)
So I shall refer to them interchangeably.


In my hours of time wasted looking at pretty dresses research, I noticed that often costumes just look better/different when on screen on the moviestars who don't actually do the full range of movement (e.g. Arwen just sort of stood when wearing the bloodred dress. It's far too long to walk in. Or her "Bridge dress" I have heard reported that when made screen-faithfully, gapes like crazy at the neck, then again, she was just standing just so for 10 minutes during filming.)


So before actually making something from a movie, I go and look up other people's reproductions, (Here is a place to start, the alleyscratch scrapbook. You can also find the correct names for each dress on alleyscratch and just google search them, and you get fan's reproductions.)  and see which ones I think look good, and which ones I think don't. I have found it actually isn't really dependent on sewing skills or even expensive materials, but the ones