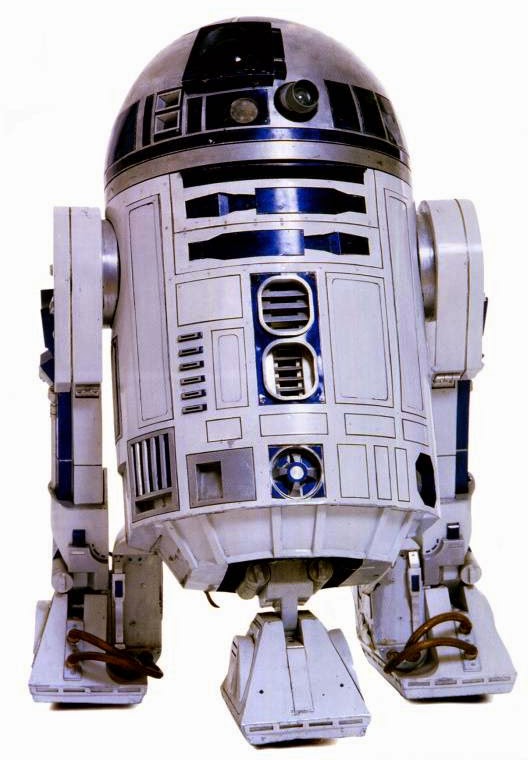
Step 1: I got a bunch of pictures of R2D2 and just eyeballed a design to print out on regular 8x11 paper.
The front is a little larger than an 8x11, so I have a second sheet with 2 strips on it, that you are supposed to cut out and tape to the sides of the front page.
 |
| R2D2 CENTER FRONT Just copy this into word, and stretch it out to fit an 8x11 sheet of paper. |
 | |
| Side strips for front. (left strip tape to right side, right strip tape to left side, of R2D2 CENTER FRONT) |
See how I taped it together?
STEP 2. And then draft a simple A-line style dress/tunic. You can literally just lay down an existing dress, or even a shirt, and just fan out the sides as desired.
I made mine from a cotton sheet, flat lined with the same sheet so it wouldn't be see through. If I did it all over again I would do it from a cotton poly sheet, flat lined with cotton. (because cotton poly doesn't wrinkle as much, and you can't iron it once you put the fabric paint on it.)
Step 3: Take the front dress piece (not with the lining! you want it to be see through for this step), and slide the template beneath it, then trace it off with graphite pencil. You don't have to worry about the pencil lead coming out, since this part is going to be all covered up anyway. You can use a ruler to help with the straight lines.
 |
| putting the template under the white fabric front... |
 |
| tracing.... |
Step 4: Now that you've got the lines that are going to be silver, cut out the parts of your template that you want to be colored. (See R2D2 above)
Now use them as pattern pieces and cut out of blue or grey fabric, depending on the piece. Felt is the easiest option, but I wanted to do something that I could run many times through the wash without worrying about it getting fuzzy over time. (she's worn this to the zoo, gotten mud and chocolate and ketchup on it, and I just run it through the wash. I like things being practical)
So I bought a blue T shirt from the thrift store, and used like half of one short sleeve. I wish I did the same with the grey parts, but I had some grey canvas on hand, so I used that. Bad idea, it frayed a bit and I ended up going over it with fabric paint on the edges.
 |
| Use the cut out template bits as pattern pieces. I like tracing stuff on dark material with soap. |
NOTE FOR NEXT TIME: USE HEAT N BOND!!! Or a heavy duty interfacing! If you iron this onto your (jersey fabric) pieces BEFORE cutting them out, then they will be SOOO much easier to work with. My non-interfaced bits of jersey fabric stretched as I sewed them, changing shape and making it much harder to try not to stretch them when sewing them on.
Now, if you are using interfacing, you would have just ironed the interfacing onto the fabric. THEN cut out the pattern pieces, then laid them on the places on the dress, and just ironed them on, ready for sewing.
I just sort of laid my cut out pieces on and tried to hold them in place with my fingers...
 |
| Blue parts laid on. You see the template pieces still there still need to be cut out of grey material. |
STEP 5 Sewing it on!
 |
| Do the same for the grey pieces. |
Here is a picture of the inside of the R2D2 dress after I had sewn the blue strips on. I went over it a few times because it was being wiggly. Again, if you are using a fusible interfacing you could get much cleaner lines.
STEP 6:
Now its all ready for the fabric paint! This you will trace out the silver lines on most of R2D2, and do the detail work. I used dimensional silver paint.
If I could do this all over again, I think I would use regular flat fabric paint.
 |
| All ready for painting. Note the pencilled lines we are now going to do with paint. |
Next time I do this, I'm going to do the back too...
Step 7: Photograph your cutie. I made the hat out of a simple 4 panel design, and just sewed the patches onto it after I sewed it together....there isn't a template for that, but I might make one at some point....
(I'll link it here when I do)
I think I'm going to make another of these, and also an R2D2 inspired dress, where I take R2's head detail and put it on a grey bodice of the dress. I saw something on etsy like that once, but it has been delisted, alas.
I just love R2, he's so wholesome and good...and he's just perfect for a 2 year old costume, 2 year olds that empathize with getting into trouble and trying to communicate with the larger world that has such a hard time understanding what you are trying to say...


No comments:
Post a Comment